In summary:
- Treat the wood stove as the heart of a “cabin ecosystem,” not just a heater. Use it for warmth, water, cooking, and morale.
- Mastering overnight heat is about slow-burning techniques combined with personal “thermal resilience” using the right gear.
- Prioritize ventilation. An airtight modern cabin can be a death trap; you must balance heat retention with fresh air intake to prevent CO poisoning.
- Success depends on preparation: having enough seasoned wood, a filed trip plan, and an emergency kit are non-negotiable.
The first lesson the Canadian wilderness teaches you is that cold is not just an inconvenience; it’s an active force. For anyone renting a rustic cabin for the first time, the fear is palpable. Will the fire go out at 3 a.m.? Will we wake up shivering, or worse, not wake up at all due to a silent, odourless gas? The internet is full of simple advice: use dry wood, clean the chimney. While true, this advice misses the fundamental point of off-grid living. Staying warm in a cabin isn’t about following a simple checklist; it’s about mastering a complete survival system.
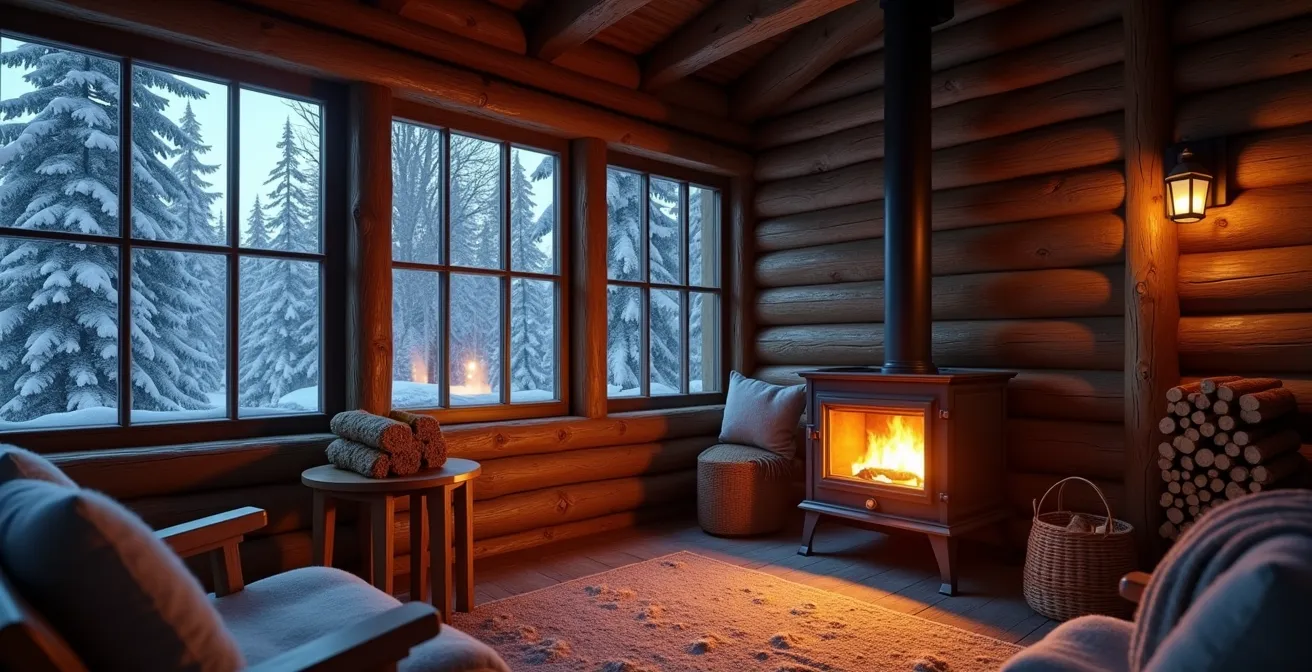
The common approach treats the wood stove as a simple appliance. You put wood in, you get heat out. But a true homesteader sees it differently. The stove is the heart of a living, breathing cabin ecosystem. It dictates how you get water, how you cook, how you manage food, and even how you maintain your sanity when the temperature plummets and the power grid is a distant memory. The real key to a safe and comfortable night isn’t just banking the fire correctly; it’s understanding the holistic relationship between your heat source, your shelter, and yourself.
This guide abandons the simple tips. Instead, we’ll build your competence from the ground up, adopting a homesteader’s mentality. We will explore why the stove is crucial for your mental state, how to turn it into a multi-tool for hygiene and cooking, and how to navigate the critical balance between warmth and deadly ventilation mistakes. By the end, you won’t just know how to run a stove; you’ll understand how to command your entire cabin environment for ultimate safety and comfort.
This article breaks down the essential knowledge needed to transform you from a worried renter into a capable cabin dweller. The following sections will guide you through the complete system, from the psychology of warmth to the practicalities of emergency preparedness.
Table of Contents: A Guide to Mastering Your Cabin’s Wood Stove
- Why is cabin culture essential for surviving the Canadian winter mentally?
- How to manage hygiene and cooking without running water?
- Instant warmth or romantic crackle: which heating source requires less maintenance?
- The ventilation mistake that makes airtight cabins deadly
- What food items to bring that won’t freeze or spoil in a cooler?
- How to build a survival kit for a 3-day hike in the Yukon?
- The error of burying your face in the sleeping bag that freezes the zipper
- How to prepare for a remote wilderness trip in Northern Canada safely?
Why is cabin culture essential for surviving the Canadian winter mentally?
Surviving a Canadian winter, especially in a remote setting, is as much a mental challenge as a physical one. The relentless cold and isolation can be taxing. This is where “cabin culture” becomes a survival tool. It’s a mindset rooted in competence, self-reliance, and a deep appreciation for the systems that keep you safe. At the center of this culture is the wood stove. It’s more than a heater; it’s a symbol of your independence from a fragile grid. This psychological comfort is immense.
Knowing you can provide for your own warmth, cook your own food, and melt snow for water fosters a powerful sense of security. This feeling of capability actively pushes back against the anxiety that the deep, dark winter can bring. As the experts at Forge & Flame point out in their guide to stove selection, this independence is a critical safety factor during the ice storms common to Eastern Canada.
The wood stove represents total off-grid independence, a crucial safety factor during ice storms that can cripple power grids for days in provinces like Quebec or the Maritimes.
– Forge & Flame, How to Choose the Right Wood Stove for Your Cabin
This is not just theory. Outdoorsman Nicklaus Cobb, who built his own off-grid cabin in a climate that hits -30°F, chose a wood stove specifically for its reliable, off-grid heat. For three years, it has been his sole source of warmth, providing not just physical comfort but the mental peace of mind that comes from being truly self-sufficient. This is the essence of cabin culture: turning potential hardship into an opportunity for demonstrating competence and building mental resilience.
How to manage hygiene and cooking without running water?
In an off-grid cabin, the wood stove is not just for ambient warmth; it’s your utility hub. This is the “Heat as a Multi-tool” concept in action. Without running water, the stove’s flat, hot surface becomes your source for everything from a hot drink to a sponge bath. The key is to establish an efficient multi-pot system, transforming snow into usable water for different purposes.
This system ensures you have a constant, rotating supply of water at various temperatures. One large pot is for melting clean snow (always gather it from an upwind, untrodden area), another kettle is for hot water for washing, and a third, separate pot holds boiled, potable water safe for drinking and cooking. This disciplined approach prevents cross-contamination and makes life infinitely more comfortable. You can even use the heat to slow-cook a meal in a Dutch oven while your water pots are working.
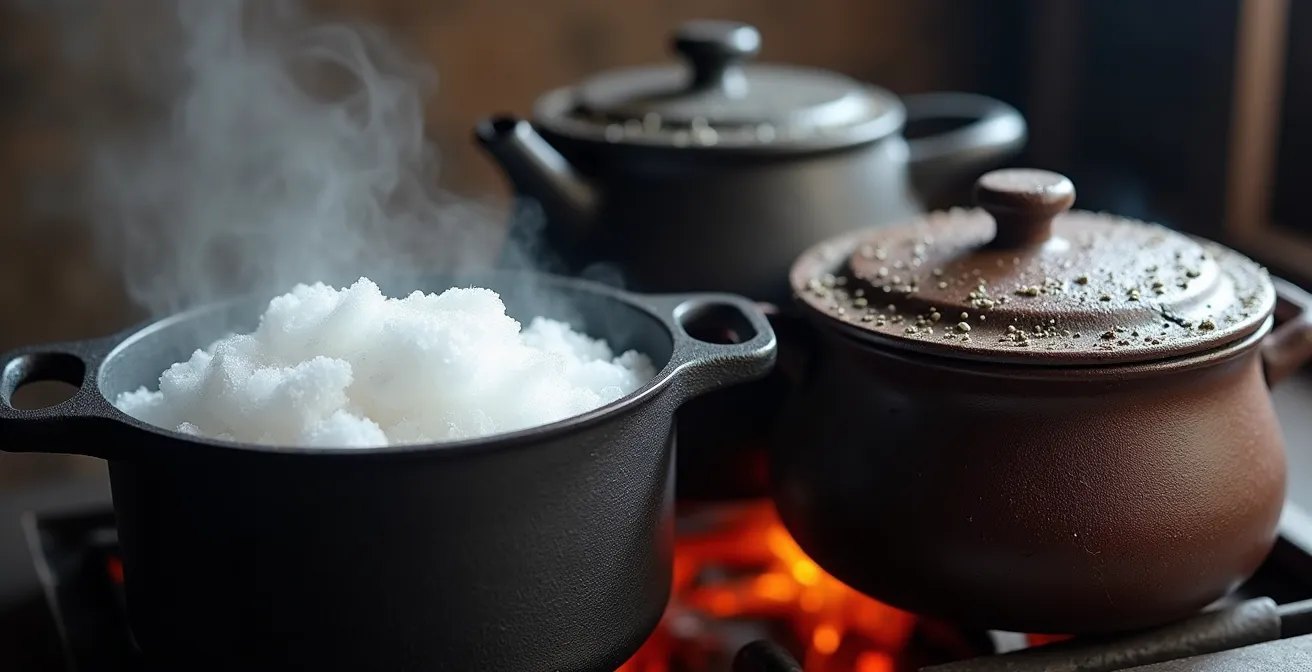
As the image above illustrates, this isn’t a chaotic mess but an organized system. A well-managed stove top allows you to have everything you need at the ready. Here’s a practical breakdown of the multi-pot water system:
- Pot 1 (The Melter): A large stockpot dedicated to melting clean snow into water. This is your raw supply.
- Pot 2 (The Kettle): A cast-iron kettle holding hot, but not necessarily boiled, water for dishes and personal hygiene.
- Pot 3 (The Drinker): A dedicated pot for water that has been brought to a rolling boil, making it safe for consumption. Never mix its use.
- Warming Shelf: Use any available warming shelves to keep water containers from freezing and ready for use.
- Cooking Vessel: A Dutch oven on a trivet beside the stove can use the radiant heat for slow-cooking stews or tourtière, freeing up the main surface.
Instant warmth or romantic crackle: which heating source requires less maintenance?
For a cabin renter, the choice between a wood stove and a propane heater often comes down to a simple question: which is easier? A propane heater offers push-button convenience and thermostat-controlled heat, requiring almost no daily effort. A wood stove, with its romantic crackle, demands a hands-on approach: loading wood, managing dampers, and cleaning ash. But “less maintenance” is a deceptive term in the Canadian wilderness.
While propane is easier day-to-day, its long-term maintenance and fuel logistics can be a major challenge. You’re dependent on deliveries, which can be difficult or impossible in heavy snow. The systems also require professional servicing. A wood stove, by contrast, puts you in complete control. Your fuel is stacked outside, and while it requires your labour, it is 100% off-grid capable and independent of supply chains or power for fans. However, this independence comes with a critical responsibility in Canada: safety certification. As insurance industry data confirms, most Canadian insurance companies require a Wood Energy Technology Transfer (WETT) inspection to ensure the stove and chimney are installed correctly.
The following table breaks down the real maintenance trade-offs for a Canadian cabin context.
| Aspect | Wood Stove | Propane Heater |
|---|---|---|
| Daily Maintenance | Loading wood, removing ash, adjusting dampers | Thermostat adjustment only |
| Annual Maintenance | Chimney cleaning, gasket replacement, creosote check | Professional inspection, valve checks |
| Fuel Management | Wood splitting, stacking, seasoning (6+ months) | Tank delivery scheduling, winter access challenges |
| Power Independence | 100% off-grid capable | May require electricity for fans/thermostats |
| Canadian Certification | WETT inspection required | Licensed gas fitter installation |
Ultimately, a wood stove requires more work but offers greater resilience and independence. A propane heater offers convenience but creates dependencies that can be a liability in a remote setting. For the homesteader mindset, the “maintenance” of a wood stove is not a chore; it’s the very act of ensuring one’s own survival and comfort.
The ventilation mistake that makes airtight cabins deadly
The single greatest danger in a modern wilderness cabin isn’t the cold; it’s a misunderstanding of ventilation. Old, drafty cabins naturally drew in fresh air to feed the fire. But new, energy-efficient and airtight cabins can create a deadly trap. A roaring fire consumes a huge amount of oxygen. In a sealed space, this can create negative pressure, causing the stove to “backdraft”—spilling smoke and lethal, invisible carbon monoxide (CO) into the room. This is not a minor risk; it’s a critical safety failure.
The danger is insidious because it’s counter-intuitive. You’ve sealed the cabin to keep it warm, but in doing so, you’re starving the very appliance that’s providing the heat. In fact, Natural Resources Canada warns that modern airtight cabins can easily create this negative pressure scenario, leading to CO spillage. This is why managing the “Ventilation Balance” is a life-or-death skill. You must have a source of fresh, external air ducted directly to the stove or a well-managed ventilation system like a Heat Recovery Ventilator (HRV).
Before ever sleeping in a cabin with a wood stove, you must verify its ventilation and safety systems. Never assume it’s been done correctly. Your life depends on being proactive and checking for these critical components. This is non-negotiable.
Action Plan: Cabin Ventilation and CO Safety Audit
- Verify Air Supply: Look for a dedicated external air intake pipe connected directly to the stove. If not present, identify the Heat Recovery Ventilator (HRV) and ensure it’s operational.
- Install CO Detectors: Confirm there is a primary CO detector on each floor, especially near sleeping areas. Bring your own battery-powered backup detector as a failsafe.
- Test for Negative Pressure: When lighting the fire, crack a nearby window. If the smoke-draw improves noticeably, it’s a major red flag for negative pressure in the cabin.
- Check Clearances: Ensure all combustible materials (walls, furniture, wood pile) are a safe distance from the stove, as specified by the manufacturer or WETT guidelines.
- Plan Your Escape: Before your first night, create and practice a winter evacuation route with all occupants. Know how to get out quickly in the dark and cold if an alarm sounds.
Do not be complacent about this. Carbon monoxide is a silent killer, and an airtight cabin is its perfect hunting ground. The responsibility for ensuring a safe environment rests entirely on you.
What food items to bring that won’t freeze or spoil in a cooler?
In a winter cabin, your food strategy needs to be as robust as your heating plan. The challenge is twofold: preventing items from spoiling and, more critically, preventing them from freezing solid. The solution lies in choosing the right foods and using your cooler in a counter-intuitive way: as an insulator against the cold, not a cooler. By keeping it inside the cabin, away from the immediate heat of the stove, you create a stable microclimate that’s cool but above freezing.
The best foods for this environment are those with high-fat content, which have a lower freezing point. Think aged cheeses, cured meats like salami or prosciutto, and nut butters. Traditional Canadian staples are also perfect. A pre-cooked, frozen tourtière or other meat pie can be brought along and slowly reheated on the wood stove for a hearty, low-effort meal. Vacuum-sealed smoked salmon, a staple from British Columbia, is another excellent, durable option.
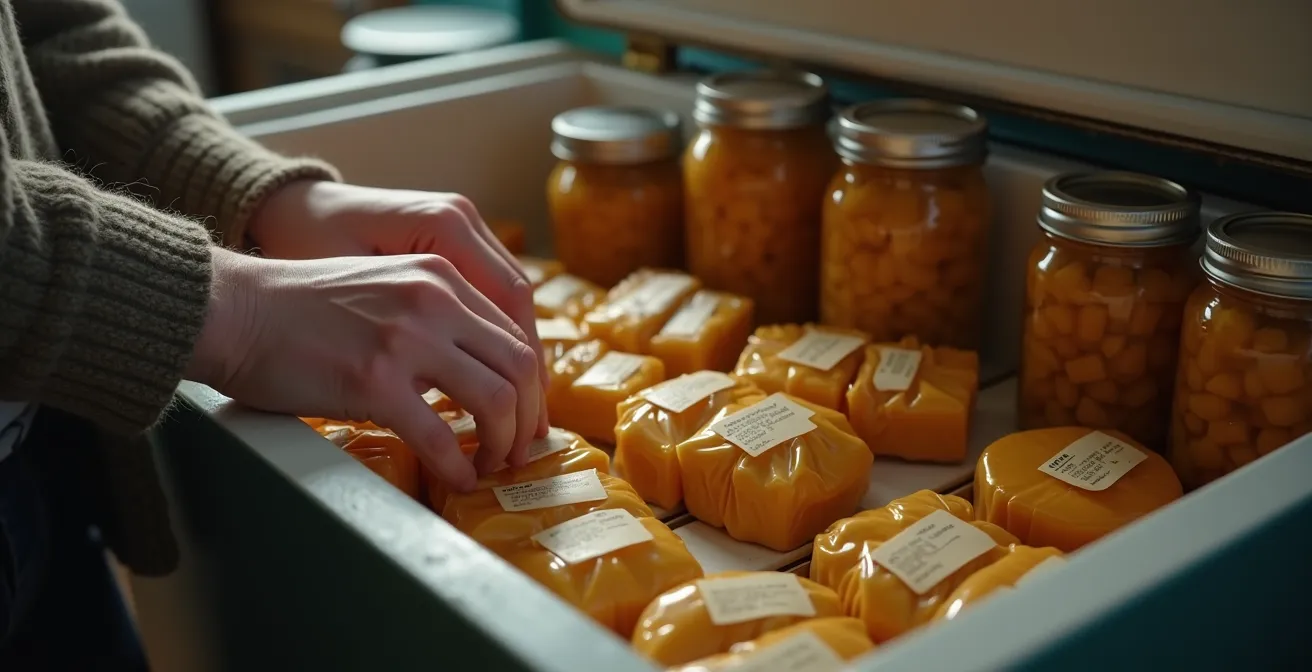
As the image suggests, this is about thoughtful organization. You’re creating a pantry that leverages the cabin’s unique thermal environment. Anything you want to keep frozen (like that tourtière before you cook it) can be stored in a snow pit dug outside. Items you want to keep cool but not frozen go in the indoor cooler.
- High-Fat & Preserved: Pack aged hard cheeses, cured meats, nut butters, and oil-based items.
- Hearty & Reheatable: Bring pre-cooked and frozen meals like meat pies, stews, or chili. They are dense and reheat well on the stove.
- Durable Produce: Root vegetables (potatoes, carrots, onions) and apples are hardy and store well in the cool environment of the insulated cooler.
- The “Inside Cooler”: Use your cooler inside the cabin to protect items like eggs, cheese, and vegetables from freezing overnight when the cabin temperature drops.
- The “Outside Freezer”: Use a simple snow bank or dug-out pit to keep items you want to remain frozen solid.
How to build a survival kit for a 3-day hike in the Yukon?
While the title asks about hiking, the savvy homesteader knows that a well-stocked wilderness survival kit is also your last line of defense inside the cabin. This is your “Thermal Resilience” plan. What happens if you make a mistake, run out of properly seasoned wood, and the fire dies in the middle of a -30°C night? Your primary heating system has failed. The gear in your Yukon-grade survival kit now becomes your personal, life-saving heating system.
You don’t just throw this kit in a closet. The most critical items should be accessible from your bed. This isn’t about planning for a comfortable night; it’s about planning to survive an uncomfortable one. A sleeping bag rated for at least -30°C is not a luxury; it’s a piece of essential survival equipment. But a bag alone may not be enough. An emergency mylar bivy sack, which weighs almost nothing, can add critical degrees of warmth by reflecting your body heat.
Furthermore, if the fire goes out, you need to be able to restart it with cold, numb fingers. This is why a three-layer fire-starting system is crucial. You need the convenience of a lighter, the reliability of waterproof matches, and the brute-force certainty of a ferro rod. Always be on the lookout for natural tinder like birch bark to keep your emergency supply stocked. Finally, in the true North, self-rescue is often not an option. A satellite communication device is non-negotiable for any remote trip.
Core Cabin Emergency Kit (Adapted from a Hiker’s Kit):
- Primary Shelter: A -30°C rated sleeping bag, stored near your bed, not packed away.
- Emergency Insulation: A mylar emergency bivy sack to layer inside or outside your sleeping bag.
- Redundant Fire Starting: A system of three sources: a lighter, waterproof matches, and a ferrocerium rod with a striker.
- Extremity Warmers: A supply of chemical heat packs for hands and feet, which can prevent frostbite during a heating failure.
- Communication Lifeline: A satellite messenger like a Garmin inReach or ZOLEO. A cell phone is not a reliable safety device in Northern Canada.
The error of burying your face in the sleeping bag that freezes the zipper
You’ve done everything right: the fire is banked for a slow burn, your emergency kit is ready. Now comes the fine-tuning of overnight comfort. As the fire dies down and the cabin temperature slowly drops, your body becomes the primary heat source. The most common mistake rookies make is burying their face inside their sleeping bag for warmth. This is a critical error. The moisture from your breath will condense and freeze on the bag’s collar and zipper, potentially trapping you inside or simply making the bag a damp, cold mess.
The correct technique is to keep your face out and use dedicated headwear. A high-quality, Canadian-made wool toque and a neck gaiter or balaclava will keep your head and neck warm while allowing moisture to escape into the air, not into your insulation. This is part of a broader strategy of moisture and gear management in a cooling environment. Little details, learned through experience, make all the difference. For instance, a common problem is a freezing cold bathroom located far from the stove. One homesteader shared a simple but brilliant solution: simply keeping the bathroom door open overnight allowed enough ambient heat to circulate, preventing icicles from forming on the shower head. It’s this kind of practical problem-solving that defines the homesteading mentality.
Protecting your gear is just as important as protecting yourself. The cold can be destructive to electronics, water filters, and even medications. Your sleeping bag becomes a sanctuary for these sensitive items.
Overnight Gear and Body Management Protocol:
- Wear Headwear: Always wear a toque and neck gaiter to bed. Keep your face out of the sleeping bag.
- Protect Electronics: Store your phone, batteries, and headlamp inside the sleeping bag with you to preserve their charge.
- Safeguard Water Filters: Never let a water filter freeze. The ice crystals can destroy the filter element. Keep it in a sealed bag inside your sleeping bag.
- Manage Sensitive Items: Medications or any other liquids should be placed in a small stuff sack and kept inside the bag, away from the cold cabin walls.
Key Takeaways
- Adopt a Systems Mindset: The wood stove is the heart of a “cabin ecosystem” for heat, water, cooking, and morale. Your success depends on managing the whole system, not just the fire.
- Safety Through Ventilation: The biggest risk in a modern cabin is carbon monoxide from poor ventilation. Always ensure a fresh air source for the stove and have multiple CO detectors.
- Prepare for Failure: True resilience comes from your backup plan. A high-quality, cold-rated sleeping bag and a solid emergency kit are your personal life-support system if the fire goes out.
How to prepare for a remote wilderness trip in Northern Canada safely?
All the techniques for managing a fire and surviving a cold night are secondary to the most important phase: preparation. A safe and comfortable trip to a remote Canadian cabin is determined long before you turn the key in the ignition. This is where the winter homesteading mentality truly shines—in its meticulous planning and respect for the power of the environment. The first step is acknowledging the scale of your fuel needs. You don’t just need a few logs; you need a mountain of them. In fact, experienced cabin owners report that you may need 4 cords of wood or more to get through a typical Canadian winter. For a shorter trip, you must still ensure you have far more than you think you’ll need.
Your preparation must be multi-faceted, covering everything from official safety protocols to the technical specifications of your heating system. You must operate on the assumption that you are entirely on your own. This means equipping your vehicle for extreme conditions and ensuring someone, somewhere, knows your exact plan. A trip plan filed with the local RCMP detachment is not bureaucratic red tape; it is a critical lifeline.
Before you even pack your bags, this master checklist should be your guide. It synthesizes all the elements we’ve discussed into a comprehensive pre-trip protocol. Neglecting any one of these steps introduces a significant and unnecessary risk into your adventure.
The Northern Cabin Master Preparation Checklist
- File an Official Trip Plan: Submit a detailed trip plan to the RCMP or a trusted contact, including your location, dates, and details about your cabin’s heating system.
- Calculate Your Fuel: Research the BTU needs for your cabin’s square footage (a rough guide is 20-30 BTUs per square foot) and ensure you have an ample supply of seasoned hardwood like birch, not just fast-burning spruce.
- Verify Wood Regulations: Check local regulations in territories like the Yukon or NWT regarding the transportation of firewood to prevent the spread of invasive species.
- Equip Your Vehicle: Your vehicle is your first survival shelter. It must be equipped with winter tires, chains, a full-size shovel, and basic recovery gear.
- Stock for a Season: Even for a short trip, you must confirm there is a substantial woodpile on site. A good rule of thumb is a minimum of what looks like 4-5 full trees’ worth of seasoned, split wood.
By shifting your mindset from that of a passive renter to a capable homesteader, you transform a source of anxiety into an experience of profound competence and connection with the wild. The first step is to assess your readiness and begin your preparation now.
Frequently Asked Questions about How to heat a wilderness cabin efficiently with a wood stove overnight?
How to build a survival kit for a 3-day hike in the Yukon?
The core of a Yukon survival kit, which doubles as your cabin’s emergency backup, includes a -30°C rated sleeping bag, a mylar bivy sack for extra insulation, a three-layer fire starting system (lighter, waterproof matches, ferro rod), chemical heat packs, and a satellite communication device like a Garmin inReach, as cell service is unreliable.
The error of burying your face in the sleeping bag that freezes the zipper
Avoid burying your face in your sleeping bag overnight. The moisture from your breath will condense and freeze, compromising your insulation and potentially jamming the zipper. Instead, wear a quality wool toque and a neck gaiter to keep your head warm while allowing moisture to escape freely.
How to prepare for a remote wilderness trip in Northern Canada safely?
Safe preparation involves several key steps: file a detailed trip plan with the local RCMP, ensure you have an abundant supply of seasoned hardwood (at least 4-5 trees’ worth), understand local firewood transportation regulations, and equip your vehicle with winter tires, chains, and recovery gear. Always calculate your cabin’s BTU needs to ensure your wood supply is adequate.