The biggest misconception about beginner ice climbing is that it requires massive upper body strength; in reality, it’s primarily a test of lower body endurance and balance.
- Efficient technique, taught on beginner courses, relies on your legs to drive movement, saving your arms for balance.
- Basic hiking fitness, like the ability to walk uphill for 20-30 minutes, is a far better indicator of readiness than the number of pull-ups you can do.
Recommendation: If you can handle a steep local hike like Ha Ling Peak or the upper Grassi Lakes trail, you are more than fit enough for an introductory day on the ice.
The image of ice climbing is often one of superhuman arm strength, of climbers executing endless pull-ups on glistening vertical ice. For many fit rock climbers and adventurous travellers eyeing the spectacular frozen waterfalls around Canmore, this single thought can be a barrier: “Am I strong enough?” You might hear generic advice like “it’s all about technique” or “you don’t need to be a bodybuilder,” but these platitudes fail to explain the ‘why’. They don’t address the core anxiety about upper body and grip strength, especially when you see images of elite climbers on overhanging routes.
But what if the entire physical framework you’re imagining is wrong? What if a beginner’s day on the ice isn’t a ladder of pull-ups, but rather a form of vertical hiking? The secret that mountain guides know is that efficient ice climbing is driven from the feet up. It’s a sport of balance, leg power, and precise footwork, where your arms are used more for stability than for hauling your body weight. The real physical test isn’t your biceps, but your calves, quads, and your cardiovascular ability to handle the approach hike to the base of the climb.
This guide reframes the physical demands of a beginner ice climbing course through the lens of a mountain guide. We’ll break down why your legs are your engine, how to manage the unique cold of the Canadian Rockies, and what “fit enough” truly means in the context of your first day climbing a frozen waterfall. We will explore the biomechanics of movement, the strategy of layering, and the real-world fitness benchmarks that prove you’re ready for this incredible adventure.
This article provides a complete overview of what to expect physically and mentally on your first ice climbing adventure in Canmore. The following sections will guide you through every aspect, from the fundamental techniques to choosing the right location and understanding the unique challenges of the environment.
Summary: Your Fitness and First Ice Climb in Canmore
- Why is trust in your feet more important than pull-ups on the ice?
- Crowded beauty or technical ice: which location is better for a first climb?
- What causes the intense pain when blood returns to cold hands?
- The clothing mistake of dressing for the climb rather than the standing around
- When in the spring does the ice become too “rotten” to climb safely?
- How is the cantilevered walkway anchored into the granite cliff face?
- How to walk on a glacier with a guide without risking a crevasse fall?
- How to determine if you are fit enough for a multi-day Canadian wilderness adventure?
Why is trust in your feet more important than pull-ups on the ice?
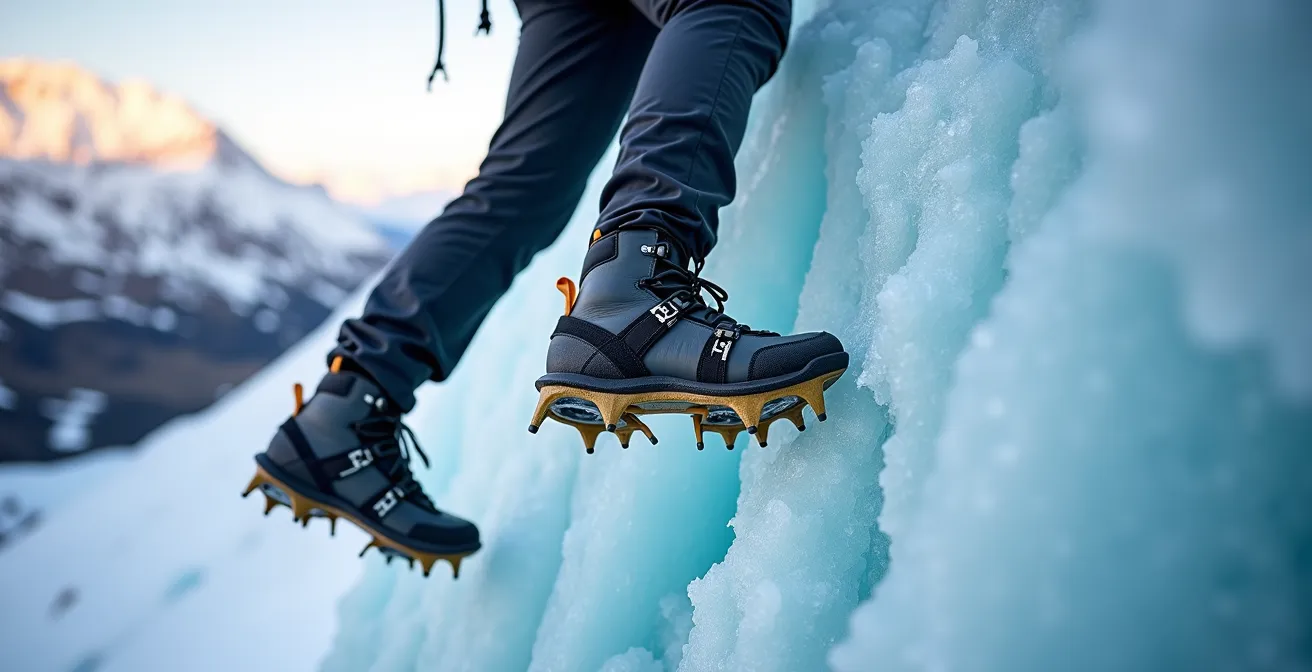
The core of modern ice climbing technique is built on a simple principle: your legs are for power, and your arms are for balance. Imagine walking up a very steep, solid staircase. You drive with your legs, using the handrail merely to steady yourself. Ice climbing is a vertical expression of this. Your crampons provide two secure, horizontal platforms for your feet with every kick. Your job is to learn to stand up on those platforms, keeping your hips close to the ice and your body weight directly over your feet. This posture, which your guide will teach you, is the foundation of efficient movement.
When you see a beginner struggling, they are almost always “over-gripping” their ice axes and trying to pull themselves up, burning out their arms in minutes. An experienced climber, by contrast, looks fluid and relaxed. They swing an axe, get a secure placement, and then focus on moving their feet up to a high, stable stance before repeating the process. According to training experts at Uphill Athlete, while vertical ice demands repeated arm movements, efficient climbing is overwhelmingly about maintaining balance by keeping your center of mass over your feet. The entire kinetic chain starts with a solid kick, travels up your legs, and is stabilized by your core. Your arms are just the final touchpoint.
This is fantastic news for anyone worried about their upper body strength. Your rock climbing fitness or general hiking endurance is far more relevant. The key is to shift your mindset from “pulling” to “stepping.” Trusting that a few millimeters of metal in the ice can hold your entire body weight is a mental skill, and it’s the first and most important one you will learn.
Action Plan: Auditing Your Fitness for the Ice
- Points of contact: Identify the key physical “touchpoints” for a beginner day: cardiovascular endurance for the approach, leg strength for the climbing, and basic grip endurance for holding the tools.
- Collecte: Inventory your current abilities against real-world Canmore benchmarks. Can you complete the Ha Ling Peak hike or the upper Grassi Lakes trail? Can you do 20 bodyweight squats? Can you walk up a steep hill for 20 minutes?
- Cohérence: Confront your collected data with the sport’s demands. If you can do the hikes, your cardio and leg strength are consistent with what’s needed. The ability to hang from a bar for 30 seconds is a bonus for grip, but not a requirement.
- Mémorabilité/émotion: Assess your mental readiness. Is the “signal” of the challenge exciting? A strong, memorable desire to try the sport is a key indicator of the determination needed to push through initial discomfort.
- Plan d’intégration: If you identify a gap (e.g., hiking endurance), create a simple plan to integrate more steep walks or bodyweight squats into your routine before your course. Your focus should be on legs and cardio, not pull-ups.
Crowded beauty or technical ice: which location is better for a first climb?
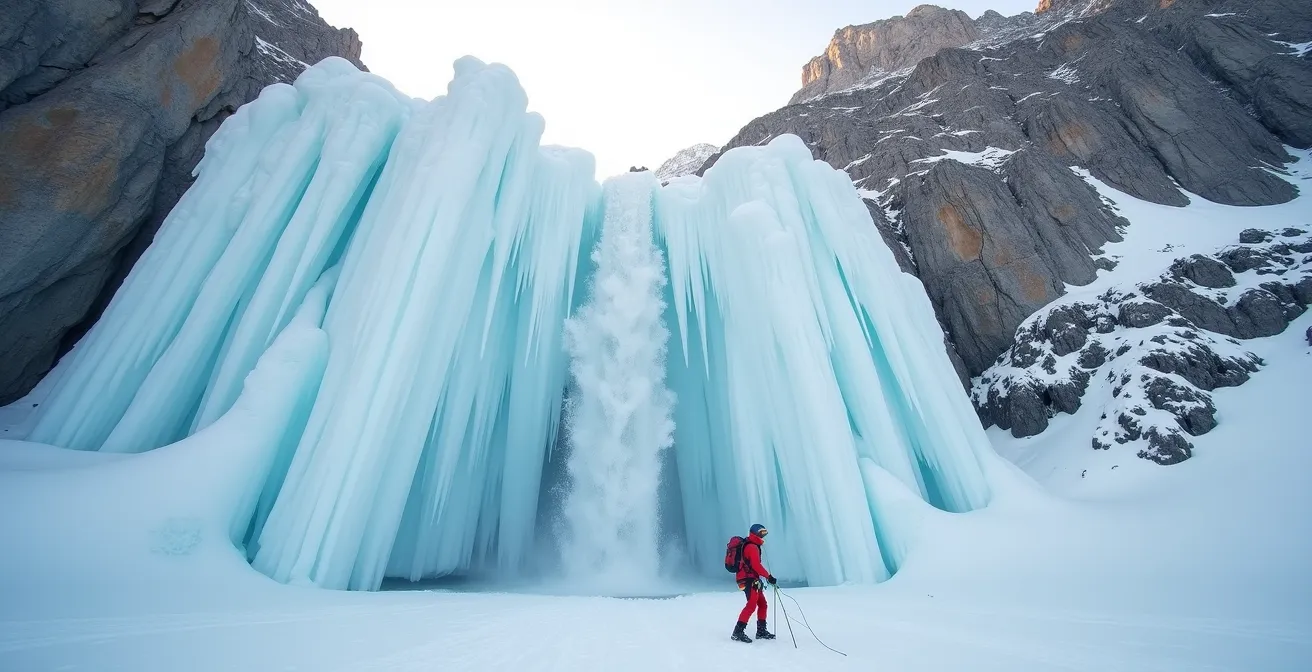
Canmore is a world-class ice climbing hub, and as a beginner, you are spoiled for choice. Your decision often comes down to a trade-off: do you want the postcard-perfect visual of a huge, famous waterfall, or a quieter, more focused learning environment? Each has its merits for a first-timer. Locations like Johnston Canyon offer breathtaking beauty with a very easy approach, but this accessibility comes at a cost. They are often extremely crowded with other climbers and general tourists, which can add a layer of pressure.
In contrast, areas like Grotto Canyon or the “Junkyards” near Grassi Lakes may feel more “wild.” The approach might be a mini-adventure in itself—like walking up a frozen creek bed—and while the ice formations might be less grand, they often provide a wider variety of angles and ice types. This is ideal for learning the nuances of tool placement and footwork without an audience. For a first day, a less-crowded venue allows you and your guide to focus entirely on the skills, maximizing your learning and enjoyment.
Case Study: The Johnston Canyon Dilemma
Johnston Canyon highlights the unique challenges of a high-traffic area. While visually stunning, local climbing reports express significant safety concerns due to tourist interference. It’s common for hikers to ignore barriers and walk directly underneath climbers, unaware of the danger from falling ice. One report notes that “it is not unheard of to see a refrigerator-sized chunk of ice dislodge on warm days,” making crowd management a critical factor. For a nervous first-timer, the added stress of managing a non-climber audience can detract from the experience, despite the location’s beauty.
Your guide will ultimately choose the best location for the day based on conditions and group goals, but understanding these differences helps set your expectations. The following table breaks down the pros and cons of popular beginner spots in the Bow Valley.
| Location | Approach Time | Typical Crowds | Visual Impact | Learning Experience |
|---|---|---|---|---|
| Johnston Canyon | Easy 20 min walk on catwalks | Very crowded with tourists | Stunning frozen waterfalls | Good for steep ice (WI3-4) |
| Grotto Canyon | Walk up frozen creek bed (adventure itself) | Moderate crowds on weekends | Wild Rockies feel, less grand | Varied ice for technical practice |
| The Junkyards (Grassi Lakes) | 20 min walk from parking | Popular but climber-focused | Panoramic valley views | Perfect for first-timers (WI2-3) |
What causes the intense pain when blood returns to cold hands?
Welcome to the “screaming barfies.” This infamous, intensely painful experience is something every ice climber knows. It happens when your hands get very cold while climbing, causing blood vessels to constrict (vasoconstriction). You might not even notice how cold they are while you’re focused on swinging the tools. The pain comes *after* you stop climbing and lower your arms. As warm blood rushes back into the constricted vessels in your fingers, they rapidly expand, triggering a flood of pain signals that can be so intense it makes you feel nauseous—hence the name.
The sensation is alarming, but it’s temporary and a normal physiological response. The key to managing it lies in prevention. In the extremely dry, cold air of the Canadian Rockies, where temperatures of -20°C are common, proactive circulation management is critical. The goal is to never let your hands get that cold in the first place. This involves a constant cycle of climbing, re-warming, and managing your glove system. Your guide will build this into the rhythm of the day, ensuring you take breaks before you reach the pain threshold.
One of the most effective prevention techniques, as shown above, is performing vigorous ‘windmill’ arm swings while your partner is climbing. This uses centrifugal force to push warm blood out to your fingertips, maintaining circulation. It might look a little silly, but it’s a vital piece of self-care on the ice. Paired with the right equipment and strategy, you can keep the screaming barfies at bay and focus on the climb.
- Prevention: Perform ‘windmill’ arm swings every 10-15 minutes while your partner climbs to maintain circulation before hands get painfully cold.
- Glove System: Use nimble, thinner ‘climbing gloves’ while actively climbing, then immediately switch to very warm, oversized ‘belay mitts’ the moment you stop.
- Temperature Management: In Canmore’s dry cold, a thermos with a hot, sugary beverage is not a luxury; it’s essential equipment for internal warming during breaks.
- Expectation Setting: On a guided beginner course, the pace is managed specifically to prevent dangerous cold exposure. You will likely only experience mild discomfort as you learn to manage your system, not the full-blown “barfies.”
The clothing mistake of dressing for the climb rather than the standing around
One of the most common mistakes beginners make is mismanaging their energy budget. They either show up wearing a huge, bulky ski jacket, assuming colder is better, or they dress in lighter layers appropriate for a strenuous hike. Both are wrong. A day of ice climbing is a cycle of intense effort followed by long periods of inactivity. You’ll work up a sweat on the 20-minute uphill approach, get warm while climbing, and then get dangerously cold while standing still for 20-30 minutes belaying your partner. Dressing correctly isn’t about one perfect outfit; it’s about a dynamic layering system you can adjust throughout the day.
The most critical piece of this system, and the one most often forgotten by beginners, is the “belay parka.” This is a large, heavily insulated down or synthetic jacket that lives in your backpack while you’re moving. The moment you stop climbing or finish the approach hike, you throw it on over everything else (including your shell jacket). This immediately traps the body heat you’ve generated. Taking it off right before you climb prevents you from overheating and sweating excessively, which would then freeze the moment you stop. As the guides at Yamnuska Mountain Adventures advise, your clothing needs to serve two opposing functions.
Bulky clothing can restrict movement and make climbing less efficient. Clothing should be close-fitting to allow freedom of movement when using crampons and ice axes, while still keeping you warm when standing at a belay.
– Yamnuska Mountain Adventures, Canadian Rockies Beginner Ice Waterfall Climbing Guide
This means your “active” layers should be trim and breathable, while your “static” layer (the belay parka) provides the serious warmth. Standard ski or hiking pants are also a frequent point of failure; you need insulated softshell or hardshell pants to protect you from the constant contact with cold ice and snow.
- Base Layer: Merino wool next to the skin is essential. It wicks sweat during the approach hike and stays warm even when damp.
- Mid Layer: A light fleece or active insulation jacket provides warmth while you’re moving without causing you to overheat.
- Climbing Shell: A lightly insulated, breathable softshell jacket is ideal to wear while actively climbing. It blocks wind but allows sweat to escape.
- Belay Parka: The hero piece. A big, warm down or synthetic jacket that fits over all your other layers. It goes on the second you stop moving.
- Bottom Layers: Insulated softshell or hardshell pants are non-negotiable. Regular hiking pants will get wet, freeze, and ruin your day.
When in the spring does the ice become too “rotten” to climb safely?
The ice climbing season in Canmore is long, but it has a definite end. As spring approaches, the combination of longer days, stronger sun, and warmer temperatures begins to degrade the ice from the inside out. The ice becomes “rotten”—a climber’s term for ice that is honeycombed with air pockets, water channels, and has lost its structural integrity. It may look solid from a distance, but it can be weak, brittle, and unable to hold the placements of ice axes or, more critically, the ice screws used for safety anchors.
The transition to unsafe ice is gradual and highly dependent on elevation and aspect (the direction the climb faces). South-facing climbs that get a lot of sun will become unsafe much earlier than shaded, north-facing climbs in deep canyons. Generally, the season for beginner courses runs from late November to the end of March, with most guiding companies wrapping up their ice programs by the first week of April. After this point, the risk of falling ice and unreliable anchor points becomes too high.
A unique factor in the Bow Valley is the Chinook wind. These warm, dry winds can sweep down from the mountains mid-winter and raise temperatures by 15-20 degrees in a matter of hours. This can have a dramatic effect on ice conditions, creating what climbers call “hero ice.” It’s soft and easy to swing your tools into, giving a false sense of security. However, this same soft ice may lack the dense, solid structure needed for a reliable ice screw placement, a critical distinction that only experienced guides can make. For this reason, all climbing days in the late season start with a careful assessment of the day’s and previous night’s temperatures, sun exposure, and recent weather patterns.
How is the cantilevered walkway anchored into the granite cliff face?
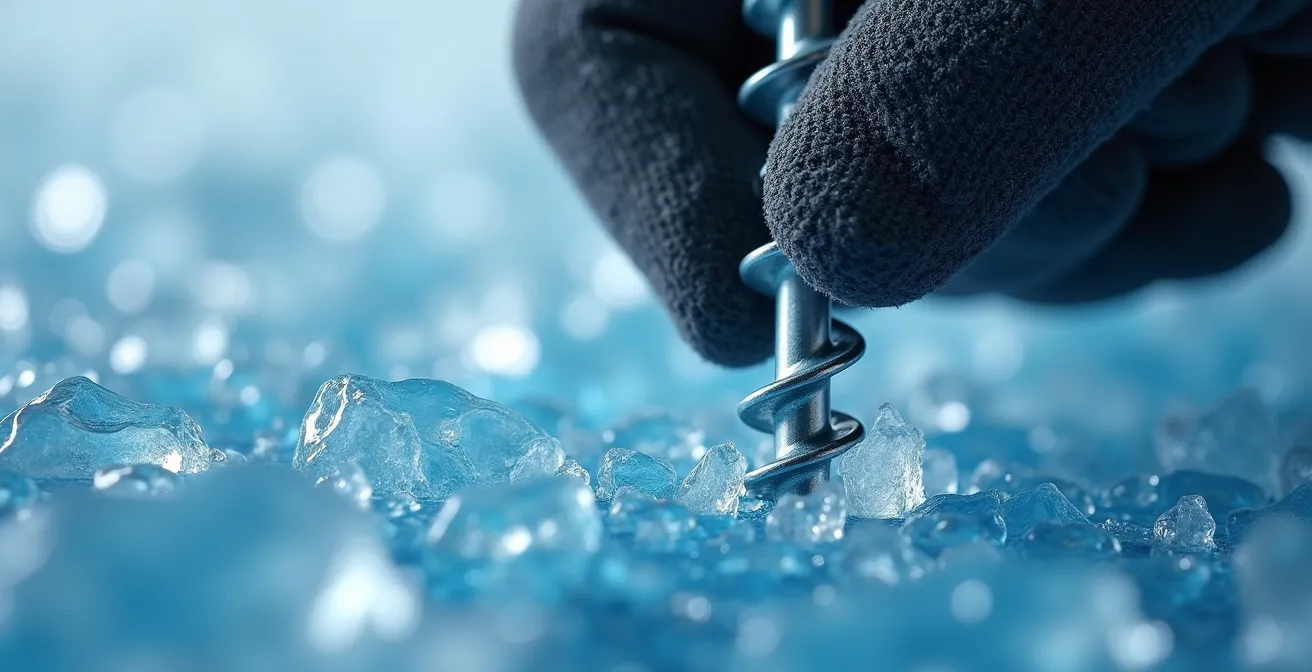
While some iconic Rocky Mountain locations feature impressive engineered walkways, your safety on a frozen waterfall relies on a different, more temporary kind of anchor. Think of your climbing system as its own “walkway” up the ice, anchored not into granite, but into the ice itself. The security of this system is a common source of anxiety for beginners, who are often amazed that a few metal points in frozen water can be so strong. The key lies in the physics of modern equipment and the expertise of your guide.
The primary tool for creating a safety anchor in ice is the ice screw. This is a hollow, threaded tube of steel or aluminum with aggressive cutting teeth at the tip. When wound into good, dense ice, its strength is immense. In fact, ice climbing safety standards confirm that a single, well-placed ice screw in good ice can hold over 10 kN of force—roughly the weight of a small car. For a beginner course, you are on a “top-rope,” meaning the anchor is built at the top of the climb *before* you start. Your guide will construct a “bomber” anchor using multiple ice screws, or by looping slings around massive, solid ice pillars. These elements are equalized, creating a redundant system where the failure of one component is meaningless. Significant falls are structurally impossible in this setup.
The real anchor, however, is your guide’s judgment. In Canada, professional guides are certified by the Association of Canadian Mountain Guides (ACMG), a rigorous process that requires years of training and examination. This certification ensures they can expertly assess ice quality—differentiating solid, blue ice from weak, aerated ice—and build anchors that are unconditionally safe for the day’s conditions. You aren’t just trusting the gear; you are trusting the certified expert who is deploying it.
How to walk on a glacier with a guide without risking a crevasse fall?
This is a common and important question for many mountain activities in the Rockies, but it’s based on a small misconception about where ice climbing happens. While glaciers are rivers of ice, the type of climbing you will do as a beginner takes place on a completely different feature: static, frozen waterfalls. As the experts at Canadian Rockies Alpine Guides state clearly, the risk of crevasses is simply not a factor in this environment.
Beginner ice climbing courses near Canmore take place on frozen waterfalls in canyons or on mountainsides, not on glaciers. The risk of crevasses is zero.
– Canadian Rockies Alpine Guides, Ice Climbing Courses and Guiding
The *real* walking challenge on your first day isn’t navigating crevasses, but rather navigating the approach trail to the base of the climb. These trails are often steep, snowy, and extremely icy. In many ways, the 20- to 40-minute approach hike is a hidden physical test that challenges your balance and small stabilizing muscles in your hips and core before you even put your harness on. It’s less about cardiovascular output and more about careful, precise footwork. Your guide will teach you how to walk effectively in microspikes, but being prepared for this part of the day is essential.
Think of it as a sustained, uphill version of the iciest winter sidewalk you’ve ever encountered in Calgary or Edmonton. This is where your general mountain sense and balance come into play, and it’s an integral part of the day’s adventure.
- Grotto Canyon Approach: A classic example involves a 20-40 minute walk directly up the frozen creek bed of the canyon. This tests ankle stability and your ability to “read” the ice underfoot.
- Gear Differentiation: You’ll typically wear light traction devices like ‘microspikes’ for the approach walk, then switch to your full, technical crampons at the base of the climb.
- Calgary Sidewalk Analogy: The best way to visualize the approach is to imagine a 45-minute uphill hike on the worst black ice you’ve ever seen.
- The Hidden Physical Test: The small, stabilizing muscles in your hips, ankles, and core get a serious workout on the approach, warming you up for the main event.
Key Takeaways
- Ice climbing for beginners is a lower-body sport; focus on leg strength and balance, not pull-ups.
- A dynamic layering system, especially a “belay parka” for when you’re stationary, is more critical than any single warm jacket.
- Fitness for a steep, 30-minute hike is the best real-world indicator that you’re ready for an introductory course in Canmore.
How to determine if you are fit enough for a multi-day Canadian wilderness adventure?
While a beginner ice climbing course is typically a single-day outing, the fitness required serves as an excellent benchmark for your readiness for longer adventures in the Canadian Rockies. The combination of cardiovascular output, specific muscle endurance, and mental fortitude provides a full-spectrum test. If you can comfortably complete a day of ice climbing, you likely have the foundational fitness for more sustained, multi-day trips. The key is to move beyond vague notions of being “in shape” and look at specific, functional benchmarks.
The consensus among Canmore’s top guiding companies is that enthusiasm and a baseline of hiking fitness are the only true prerequisites. You do not need to be an elite athlete. The question is not “can you do a pull-up?” but rather “can you walk up a steep hill without being completely exhausted?” and “can you tolerate some muscular soreness the next day?” Ice climbing will tax your calves (from standing on your front points) and your forearms (from gripping the tools) in ways that are new to most people, similar to the soreness you’d feel after a full day of skiing for the first time in a season.
Ultimately, if you’re an active person who enjoys a good hike, you are ready. As Canadian Rockies Alpine Guides put it, the barrier to entry is lower than most people imagine.
This ice climbing course is suitable for anyone with reasonable fitness and a bit of determination, no previous climbing experience is required. Enthusiasm and basic hiking fitness are the only prerequisites.
– Canadian Rockies Alpine Guides, Intro Ice Climbing Weekends
To give you a concrete checklist, here are the fitness benchmarks used by local guides to confirm a client’s readiness. If you can tick these boxes, you are ready to climb.
- Grip Test: Can you hang from a pull-up bar for 30 seconds? This indicates sufficient grip endurance for a beginner day.
- Leg Power: Can you perform 20 bodyweight squats without complete exhaustion? This confirms you have the leg drive to power the climbing.
- Cardio Check: Can you walk up a steep hill for 20 minutes? This simulates the approach hike to most local climbs.
- Real-World Test: If you can complete a popular local objective like the Ha Ling Peak hike or the upper Grassi Lakes trail, you have more than enough fitness.
- Recovery Expectation: Be prepared for next-day soreness in your calves and forearms, much like the feeling after a demanding day of a new sport.
Now that you know you have the fitness required, the next logical step is to experience the thrill of swinging the tools and walking up a frozen waterfall for yourself. Booking a day with a certified local guide is the safest and most rewarding way to enter this incredible sport.