You’ve travelled to Yellowknife, the Kp index is high, yet the sky remains stubbornly dark or clouded over. The truth is, relying on the Kp index alone is a recipe for frustration. A successful aurora hunt in Canada depends on mastering the “Aurora Trifecta”: validating the full space weather picture (not just Kp), conquering local terrestrial conditions like cloud cover and light pollution, and ensuring your gear is prepared for the extreme cold. This guide gives you the tactical advantage to turn frustrating nights into unforgettable light shows.
There’s a unique frustration that every aspiring aurora chaser in Canada knows intimately. It’s the feeling of standing under a clear but empty sky in Yellowknife or Whitehorse, phone in hand, looking at a forecast promising a Kp 5 storm that simply never arrives. You did everything the internet told you: you went north, you found a dark spot, and you checked the Kp index. So, what went wrong? The common advice, while not incorrect, is dangerously incomplete. It treats the aurora like a simple on/off switch tied to a single number.
The reality is that a successful aurora chase is about managing a complex equation with three core variables, what seasoned chasers call the Aurora Trifecta. The first is space weather, which goes much deeper than just the Kp index. The second is your immediate terrestrial environment—the war against clouds and light pollution. The third, and often the most punishing in Canada, is gear and personal readiness for the brutal cold. Ignoring any one of these elements is why so many return home with little more than cold hands and a disappointing story.
But what if you could move beyond basic predictions and start thinking like a strategic hunter? This guide is built to do just that. We will deconstruct the Aurora Trifecta, providing you with the scientific understanding and practical tactics to dramatically increase your odds. We’ll explore why location is more than just latitude, how to turn your camera into a low-light superpower, and how to survive, and even thrive, during an all-night vigil in the Canadian arctic cold.
This article will guide you through the critical strategies that separate the lucky tourists from the successful hunters. By understanding these interconnected elements, you will learn to interpret the data, read the environment, and prepare your equipment to finally capture the celestial spectacle you came for.
Summary: How to Truly Predict Your Chances of Seeing the Aurora Borealis in Canada
- Which northern hub offers the statistically best clear skies for viewing?
- Why driving 20 minutes out of town increases your visibility by 50%?
- How to set your ISO and exposure to capture lights the eye can barely see?
- The battery mistake that kills your camera in 10 minutes at -30°C
- When in the 11-year solar cycle are the lights most intense?
- How to position your stay to see Northern Lights from your doorstep?
- Why are prairie sunsets and storm clouds more dramatic than anywhere else in Canada?
- How to sleep comfortably in Quebec’s Hôtel de Glace when the room is -5°C?
Which northern hub offers the statistically best clear skies for viewing?
The first rule of aurora hunting is to be where the aurora is. While “go north” is a good start, the strategic chaser looks for the intersection of high geomagnetic activity and high probability of clear skies. The sweet spot for viewing isn’t the geographic North Pole, but a band of optimal viewing at what experts call 66-68° geomagnetic latitude. This is why Canadian hubs like Yellowknife, Dawson City, and Churchill are world-renowned; they sit directly under the most active part of the auroral oval.
However, being under the oval isn’t enough if you’re also under a thick blanket of clouds. This is where statistics give Yellowknife, NWT, a significant edge. With over 240 clear nights per year, its semi-arid subarctic climate provides a distinct advantage over coastal locations like Churchill, which are more prone to cloud cover from Hudson Bay. While Whitehorse in the Yukon is another excellent choice with a more accessible road network, it statistically offers fewer clear nights than Yellowknife.
To make an informed decision, it’s crucial to compare these primary hubs not just on their skies, but also on their magnetic latitude and the cost and effort of access. The following analysis breaks down the key variables for Canada’s top aurora destinations.
This table, based on a comparative analysis of northern hubs, shows the trade-offs. Yellowknife offers the best combination of geomagnetic position and clear skies but often comes at a higher cost. Whitehorse presents a balanced option, while Churchill offers the highest magnetic latitude but with a greater risk of cloudy weather and significant access challenges.
| Location | Magnetic Latitude | Clear Sky Days/Year | Access Cost |
|---|---|---|---|
| Yellowknife, NWT | 67.5°N | 240+ | High (fly-in) |
| Whitehorse, Yukon | 65.3°N | 200+ | Medium |
| Churchill, MB | 68.7°N | 180+ | High (train/fly) |
Ultimately, choosing your hub is the first strategic decision in the Aurora Trifecta. For those prioritizing the absolute highest statistical probability, Yellowknife is the undisputed champion. For those balancing odds with logistics and budget, Whitehorse is a formidable contender.
Why driving 20 minutes out of town increases your visibility by 50%?
You’ve chosen your hub and the space weather forecast looks promising. The second crucial element of the Aurora Trifecta is conquering your local environment, and the single greatest obstacle is light pollution. The glow from a city or town can wash out all but the most intense auroral displays. A 50% increase in visibility isn’t just a number; it can be the difference between seeing a faint, greyish arc and a sky filled with vibrant, dancing curtains of light. This is because your eyes—and your camera—need pure darkness to perceive the aurora’s subtle colours and structures.
The impact of light pollution is scientifically measured on the Bortle Scale, which ranks sky darkness from Class 1 (pristine) to Class 9 (inner-city). A location like downtown Yellowknife might be a Bortle 7 or 8. Just a 20-minute drive into the wilderness can transport you to a Bortle 2 or 3 sky. The effect is dramatic: NOAA’s Space Weather Prediction Center confirms that moving from a city environment to a dark rural one can allow you to see auroras at a Kp index of 3 or 4, whereas in the city, you might need a much rarer Kp 5 or 6 storm for the lights to be visible at all. You are effectively lowering the threshold for what constitutes a “good” show.
Think of it as giving yourself a massive observational advantage. By escaping the dome of city light, you are not just making the sky darker; you are increasing the sensitivity of your own eyes and allowing your camera to capture details that are simply invisible from town.
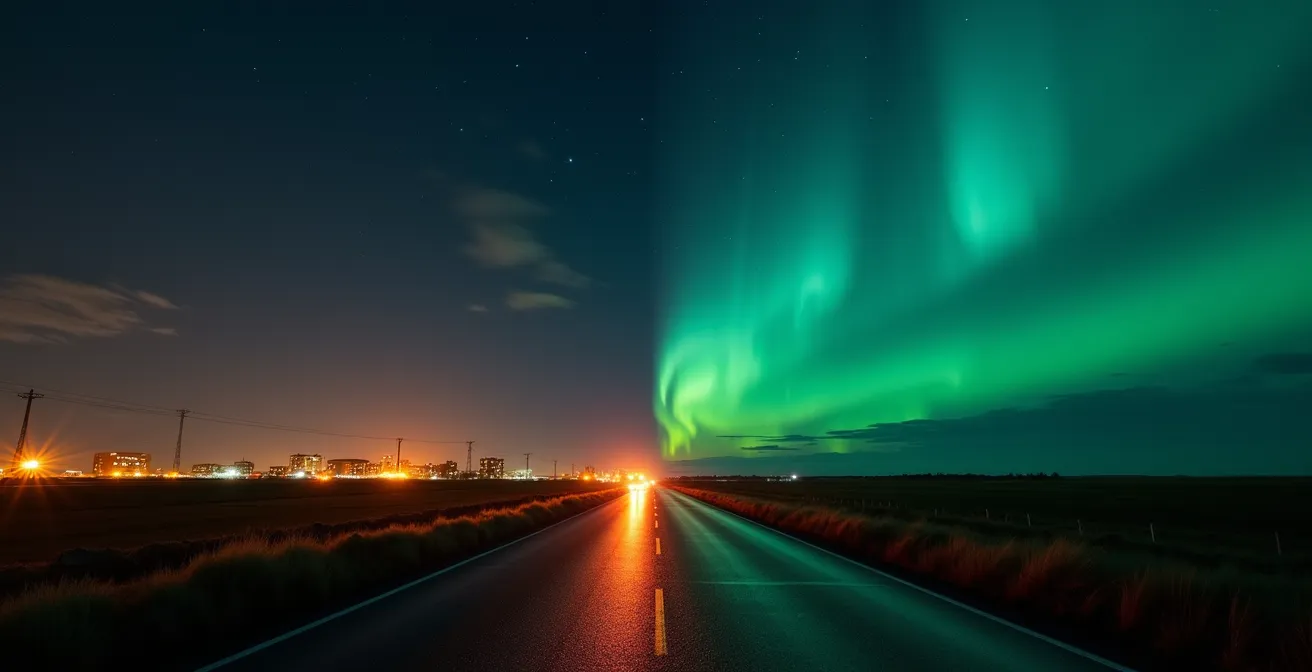
As this visual contrast shows, the journey from artificial light to natural darkness is transformative. That short drive is the single most effective action you can take to improve your chances on any given night. It means a “quiet” night on the forecast could still yield a beautiful, gentle display that would be completely missed from your hotel window. Don’t just go north; get dark.
How to set your ISO and exposure to capture lights the eye can barely see?
You’re in a dark location, under a promising sky. Now, the “Gear Readiness” part of the Aurora Trifecta comes into play. Your camera is a superpower; it can gather light far beyond the capability of the human eye, revealing colours and structures in auroras that appear as faint, whitish clouds to the naked eye. But unlocking this power requires moving beyond “Auto” mode and mastering the manual settings of ISO, aperture, and exposure time.
The fundamental challenge is balancing the need to gather enough light to see the aurora without blurring its movement. A wide aperture (a low f-number like f/1.8 or f/2.8) is your starting point, as it allows the maximum amount of light to hit the sensor. From there, your ISO and shutter speed must be adjusted based on the aurora’s brightness and speed. There is no single “correct” setting; you must adapt to the show in front of you.
For fast-dancing, dynamic curtains, you need a fast shutter speed (2-5 seconds) to “freeze” the motion and capture the intricate shapes. To compensate for this short exposure, you’ll need a high ISO (3200-6400). For slow-moving, gentle arcs that stretch across the sky, you can use a longer shutter speed (15-25 seconds) and a lower, cleaner ISO (1600-3200). The key is to always use your camera’s live view, zoom in on a bright star, and manually focus to infinity to ensure your shot is perfectly sharp. Professional photographers often start with an aperture of f/2.8, an ISO between 3200 and 8000, and adjust the shutter speed from 1 to 12 seconds, fine-tuning based on the intensity of the display.
Don’t forget your white balance. Setting it manually to a cooler temperature, around 3500-4500K, will help your camera accurately render the blues and purples at the edge of the aurora, which automatic white balance often fails to capture. These settings turn your camera from a passive observer into an active scientific instrument, revealing the hidden beauty of the night sky.
The battery mistake that kills your camera in 10 minutes at -30°C
You can have the perfect location, clear skies, and a vibrant aurora, but if your camera dies, the show is over. In the extreme cold of a Canadian winter, a fully charged camera battery can go from 100% to dead in a matter of minutes. This isn’t a defect; it’s a chemical reaction. The cold dramatically slows down the electrochemical processes inside standard batteries, crippling their ability to deliver power. This is the most brutal and unforgiving aspect of the “Gear Readiness” trifecta, and overcoming it requires a specific, disciplined strategy.
The single biggest mistake is assuming one battery is enough. The second is leaving it in the camera when you’re not shooting. At -30°C, an exposed battery will lose its effective charge rapidly, even if the camera is off. Arctic photography experts have proven that lithium batteries last up to three times longer than their alkaline counterparts in these conditions, but even they are not immune. The solution isn’t a better battery, but a better system.
This is where the two-battery rotation comes in. One battery is in your camera, powering your shots. The second, “warming” battery is kept in a pocket close to your body, such as an inner jacket pocket. Every 20-30 minutes, or as soon as you see the power indicator begin to drop, you swap them. The cold battery goes into your warm pocket to recover, and the warm battery goes into the camera. This constant rotation can extend your shooting time from a frustrating 10 minutes to several hours. For even more longevity, you can use a rubber band to attach a chemical hand warmer to your camera’s battery grip, providing a direct source of heat.
Finally, a critical step often overlooked is managing condensation. When you bring your frozen gear back into a warm cabin or car, moisture will instantly condense on and inside it, risking permanent damage. Always place your camera and lenses inside a sealed Ziploc bag *before* you go inside. This allows the gear to warm up gradually, with the condensation forming on the outside of the bag, not on your expensive electronics.
Your Action Plan: The Arctic Camera Battery System
- Start with two (or more) fully charged lithium batteries. Keep the active battery in the camera and the spare battery in a warm inner jacket pocket.
- Rotate the batteries every 20-30 minutes. Swap the cold battery from the camera with the warm one from your pocket to allow the cold one to recover.
- Use chemical hand warmers for extended life. For long sessions, attach a hand warmer to your camera’s battery compartment with a rubber band.
- Seal your gear before going inside. Place cameras and lenses in Ziploc bags before entering a warm space to prevent catastrophic condensation.
- Remove batteries and memory cards before storage. Once inside, take the batteries and cards out while the gear warms up in the sealed bag.
When in the 11-year solar cycle are the lights most intense?
While nightly planning is crucial, a truly strategic aurora chaser also thinks on a larger timescale. The sun, the ultimate source of the aurora, operates on an approximately 11-year cycle of activity, moving from a quiet solar minimum to a turbulent solar maximum. During solar maximum, the sun produces more sunspots, solar flares, and coronal mass ejections (CMEs)—the very events that trigger the most intense and widespread auroral storms on Earth. Planning a trip during or near the peak of this cycle dramatically increases your odds of witnessing a truly spectacular, high-Kp event.
We are currently in a very exciting period. According to current solar cycle predictions, the peak of Solar Cycle 25 is expected between 2024 and 2025. This means that powerful G2 (Kp 6) or G3 (Kp 7) storms, which might only occur a few times a year during solar minimum, could happen on a monthly basis. These are the kinds of storms that produce aurora visible far to the south and create breathtaking, fast-moving coronas directly overhead in the north. If you have ever considered a dedicated aurora trip to Canada, now is the time to plan it.
However, the solar maximum is not the only time for great shows. As the Geophysical Institute in Alaska wisely points out, the descending phase of the cycle can also be a prime time for strong displays. According to their experts, there is a key phenomenon to watch for.
Coronal holes during the descending phase often produce strong, sustained auroras when others aren’t expecting them.
– Geophysical Institute Alaska, Aurora Forecast Analysis
These coronal holes are openings in the sun’s magnetic field that release a high-speed stream of solar wind. While they may not have the explosive power of a CME, they can provide a steady, multi-day stream of particles that results in long-lasting and beautiful auroral displays. This expert insight reveals that even after the 2025 peak, the following years will still offer fantastic viewing opportunities for those who know what to look for beyond the headlines.
How to position your stay to see Northern Lights from your doorstep?
While chasing the lights by car offers flexibility, there is a unique magic to stepping out of your cabin and seeing the sky erupt in colour. Choosing your accommodation strategically is a key component of the “Local Conditions” pillar of the Aurora Trifecta, transforming your trip from a nightly hunt into a constant, comfortable vigil. The right lodge or rental isn’t just a place to sleep; it’s your personal observatory.
For those seeking a premium, guided experience, purpose-built aurora lodges in Canada’s north are the gold standard. For example, Blachford Lake Lodge in the Northwest Territories offers specialized viewing structures like “Aurora Pods” with heated seats and glass ceilings, allowing for comfortable viewing. In the Yukon, numerous wilderness chalets are specifically designed with large, north-facing windows and viewing decks, providing 360-degree sky views far from any light pollution. These lodges often include services like an “aurora wake-up call,” ensuring you don’t sleep through a sudden outburst of activity.
However, you don’t need a luxury budget to secure a prime viewing spot. The savvy, independent traveller can find incredible value by carefully vetting private rentals like Airbnbs. The key is to do your homework before booking. Use a combination of mapping tools to create your own DIY aurora outpost. Start with Google Maps’ satellite view to ensure the property has a clear, unobstructed view to the north—free of mountains, hills, or dense forests. Then, cross-reference the location with a light pollution map to confirm it’s in a Bortle 4 zone or darker, which usually means being at least 10-15 kilometres from the nearest town. Finally, look at the property photos for a north-facing balcony or deck, and don’t hesitate to contact the host to ask about the northern view and even if they’d be willing to text you if the lights appear.
This vetting process can help you find a stay outside Whitehorse or Yellowknife for a fraction of the cost of a full-service lodge, while still giving you that “from your doorstep” experience. Whether you choose a high-end lodge or a carefully selected cabin, the goal is the same: maximize your viewing time in comfort and minimize your dependency on driving every night.
Why are prairie sunsets and storm clouds more dramatic than anywhere else in Canada?
While the far north gets the glory, a dark horse in Canadian aurora chasing is the vast expanse of the prairies in Alberta, Saskatchewan, and Manitoba. The same feature that creates their famously dramatic sunsets and towering storm clouds—an absolutely immense, flat horizon—also makes them a surprisingly strategic location for viewing the Northern Lights. The “Living Skies” nickname isn’t just poetry; it’s a geographic reality.
The science is simple geometry. In a mountainous or forested region, your view of the sky is limited. On the prairies, you have a virtually 180-degree unobstructed horizon. This vastness means you can see auroral activity happening much further away. An aurora that is low on the northern horizon and might be completely blocked by a mountain in the Rockies could be clearly visible from the plains of Saskatchewan. This allows you to spot the very beginning of a storm hundreds of kilometres to the north, giving you time to prepare or drive towards it.
This geographic advantage enables a different kind of aurora hunting: the mobile chase. Instead of being fixed to one spot, chasers can base themselves in a city with a great road network, like Edmonton or Saskatoon. When the aurora forecast is promising, they use real-time satellite cloud-cover maps to find pockets of clear sky within a two or three-hour drive. This “drive to the clear sky” strategy, impossible in many other regions, turns the weather from an impassable obstacle into a solvable logistical puzzle. The prairies’ extensive grid of quiet rural roads becomes your greatest asset.
This strategy is particularly effective in the shoulder seasons of September-October and March-April, when you get a perfect balance of long, dark nights and more moderate temperatures than the deep winter. For the dedicated photographer, the prairie landscape also offers the unique opportunity to capture a “Holy Grail” time-lapse: the entire celestial transition from a fiery sunset, through the deep blue hour, and into the emergence of the green auroral arcs, all within one continuous, epic shot.
Key Takeaways
- Success is the ‘Aurora Trifecta’: A good Kp index is just the start. Real success comes from mastering space weather, local conditions (clouds/darkness), and gear readiness.
- Location is More Than Latitude: The best spot is the intersection of high geomagnetic latitude (like Yellowknife) and the highest probability of clear skies.
- Darkness Trumps Kp: A perfectly dark sky (Bortle 1-2) will reveal a beautiful aurora during a “low” Kp 3 event, while a “high” Kp 5 storm can be invisible from a city.
- Master the Cold or Go Home: Your gear, especially batteries, and your body will fail in extreme cold without a specific strategy like battery rotation and a proper layering system.
How to sleep comfortably in Quebec’s Hôtel de Glace when the room is -5°C?
It might seem like a strange question for an aurora hunter, but the survival techniques perfected at Quebec’s Hôtel de Glace hold the final, critical lesson for the Aurora Trifecta: mastering personal warmth. The principles that allow a guest to sleep comfortably in a room made of ice are identical to those that will allow you to stay out all night under the stars at -30°C. Failure to manage your body temperature is just as likely to end your night as a dead battery or a clouded sky. The core principle is not just about insulation; it’s about active moisture management.
The three-layer system taught to Ice Hotel guests is the definitive blueprint for any cold-weather vigil. First is the base layer, worn against the skin. This should be merino wool or a high-quality synthetic, never cotton. Its job is to wick sweat away from your body. Second is the insulating mid-layer—a fleece or down vest—which traps your body heat. Third is the windproof and waterproof shell, which protects you from the elements. This system works because it allows moisture vapor to escape. The moment sweat cools and freezes in your clothes, you will become dangerously cold, no matter how thick your parka is.
This is the lesson from the Ice Hotel: managing the transition from a warm car or cabin to the frigid outdoors is crucial. You should avoid overdressing indoors, which causes you to sweat before you even step outside. By applying this three-layer philosophy, you can remain comfortable and focused for hours, waiting for the sky to dance. Investing in proper Canadian winter gear, like Baffin boots rated to -70°C and a quality down parka with a fur-ruff hood to prevent frostbite on your face, is not a luxury—it’s essential equipment.
By mastering this final piece of the puzzle, you complete the Aurora Trifecta. You’ve aligned your chase with the sun’s rhythm, you’ve positioned yourself in a dark, clear location, and you’ve prepared your gear and yourself to function flawlessly in the extreme cold. You are no longer just a hopeful tourist; you are a prepared, strategic hunter, ready for whatever the northern sky has to offer.
Now that you are equipped with the strategies to go beyond the Kp index, the next logical step is to start planning your own chase. Assess your budget, timeline, and tolerance for cold to choose the right Canadian destination and gear for your adventure.